You’ve probably seen an old game running in a high end device like if somebody had pushed the fastforward button, or the opposite case, a high quality game trying to run in a old device with an exasperating result. To solve this problem we need to make our game framerate independent, and to do this we must to use de Delta Time.
Delta time (Δt) is the elapsed time since the last frame update, or to use other words, is the time between each rendering frame.
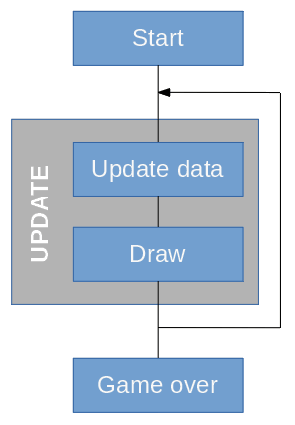
A game basically has the following flow diagram. The game starts initializing some data and enters into an update loop, inside this loop it must process the user input, update the current data and draw the new scene. When the game is over the program ends.
Let’s imagine we are doing our own engine, we need to program our update loop, the first approach is make a while loop and inside it we put the calls to process data (user input, collisions, etc.) and draw the scene. We don’t need to draw the scene each CPU tick by many factors, for example, the monitor has a maximun refresh rate of 60hz, (can only display 60 frames per second), or, the average human can accurately perceive about 150 fps, so we don’n need to draw 2000 frames per second.
We want to draw 5 frames per second so we can put an sleep of 0.25 seconds before the end of the loop step. 1 second / 4 gaps = 0.25 seconds per gap.
Game()
{
	InitializeGame();
	while(!EndGame())
	{
		UpdateData();
		Draw();
		Sleep(0.25);
	};
};
We can say that our Delta Time is 0.25 seconds
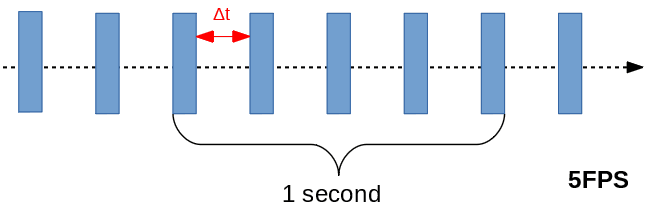
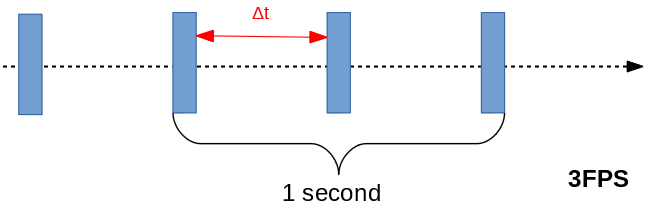
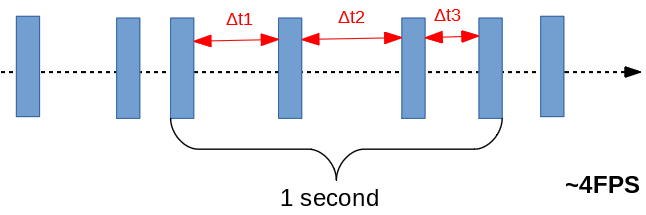
With lower fps value the Delta time will increase. As we can see in the next image, with 3 FPS de delta value is set to 0.5 seconds. 1 second / 2 gaps = 0.5 seconds
Now that we know what is the delta time, we can explain how it can be used.
Let’s suppose we want to move a square over the screen. We want to apply an uniform motion over the square so we can express its movement using the formula:
Δs = V * Δt
where s = displacement, V = velocity, t = time. The current position of the square in each frame is the sum of Δs calculated in each previous frames plus the Δs of the current frame.
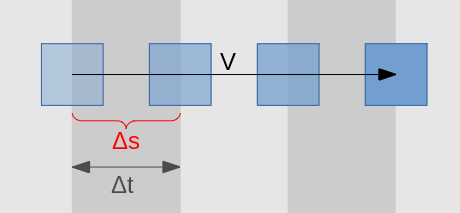
So its obvious that we need to apply the Δt of the current frame to know the exact position of the square.
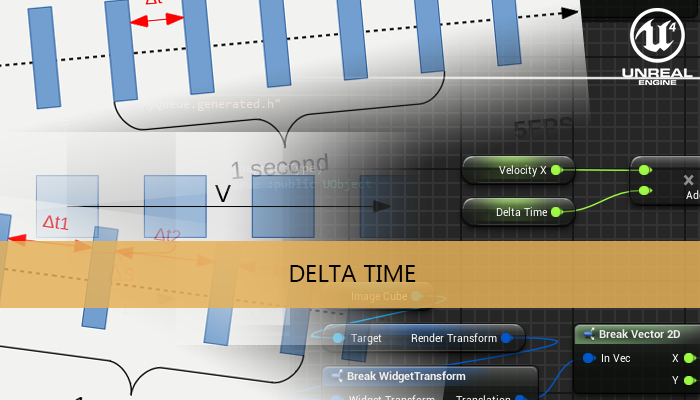
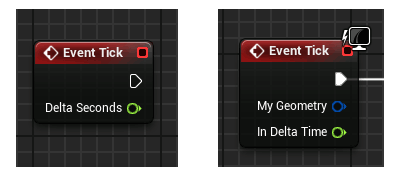
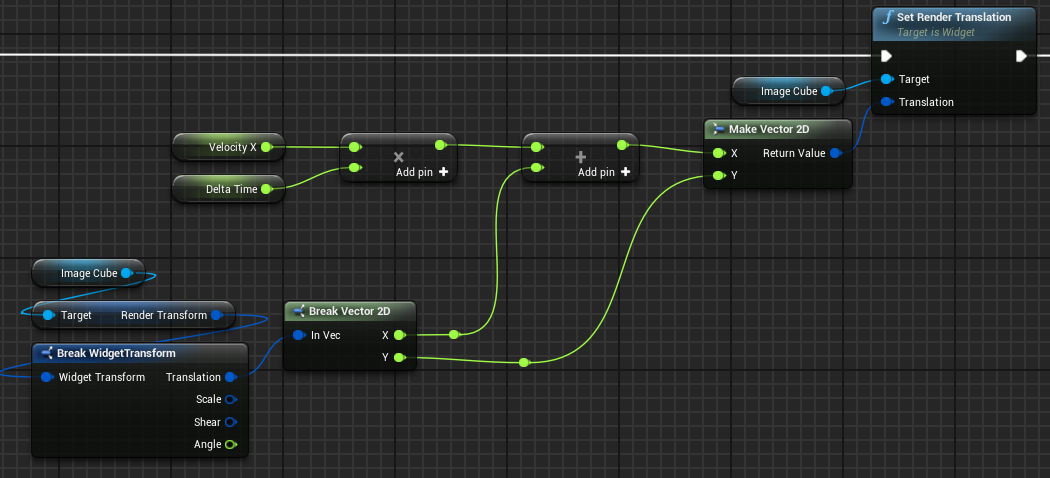
Now we can talk about to the Event Tick of UE4. This event is called every frame and has a parameter that return the real time passed since last tick, this is our Delta time.
In the above lines we were assuming the same delta time between frames, but the reality is that the delta time is variable between each frame, and the FPS counter is an average value in each second.
So we need to know the delta value of the current frame and the previous values, we can’t store only the value of the first frame and use it for all frames.
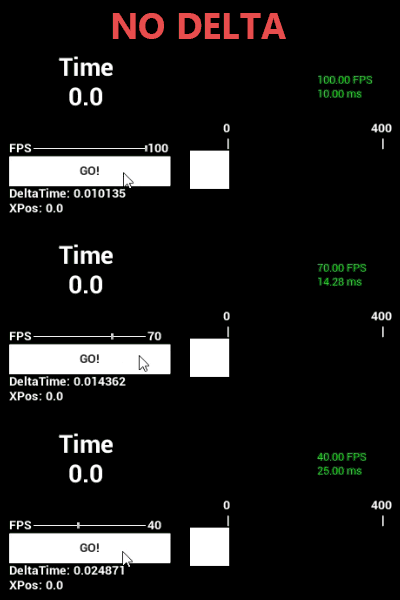
Let’s make an example using no Delta Time. We add one pixel to the X coordinate of the square image in each Tick event call. With a refresh rate of 100 FPS we will obtain a displacement of 400 pixels in 4 seconds.
But what happens when the fps is lower?. Our square needs more time to cover the same distance!. With a frame rate of 70 we need like 5.71 seconds instead of the 4 seconds. 400 pixels / 70 pixel per second = ~5.71 seconds. With 40 FPS the time would increase until 10 seconds!
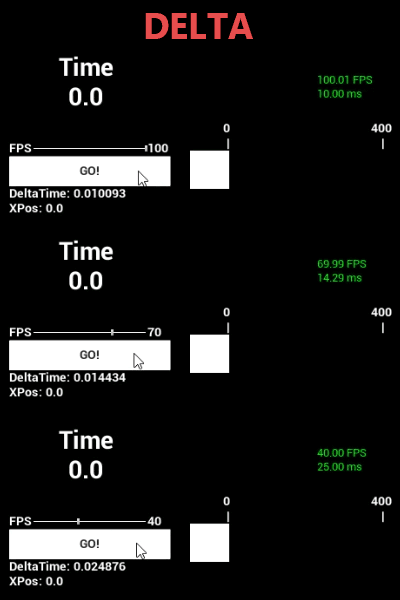
Now what happens if we introduced the delta time application. Using the previous formula where V = 100 pixels per second.
There is no difference in the time needed to cover de same distance. We are calculating the variable displacement on each frame correctly to match with the desired velocity.
With lower FPS the value of the Delta Time is increased, the displacements in this frames are bigger but we have less frames so, the final result is the same. The can say now that the game is framerate independent.
UE4 annex
During the delta time explanation we talk about that we don’t need to draw the scene in each CPU tick, it is a waste of resources. A way to reduce the Tick Events calls for an Actor is set a personal limit in the Details section.
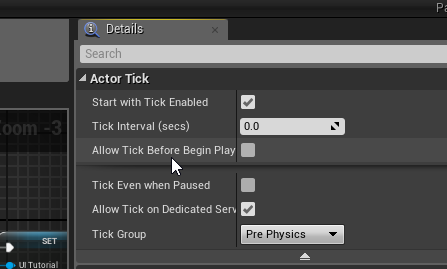
We can configure some tick options, including the tick call frequency.
Support this blog!
For the past year we have been dedicating more of our time to the creation of tutorials, mainly about game development. If you think these posts have either helped or inspired you, please consider supporting this blog. Thank you so much for your contribution!


