
High Level Shading Language (HLSL) is a programming language that can be used to program modern graphics cards, supports the shader construction with C-like syntax, types, expressions, statements, and functions. UE4 material editor is a good tool to create shaders but sometimes it becomes a bit “tangled”.
It is worth to note that this is not a tutorial on how to program shaders in general, or how to write HLSL, but rather how to get shaders working in UE4. For learning how to program shaders or HLSL, I recommend other resources, such as Neatware HLSL: Introduction or Microsoft MSDN
We can start with a small practical example. We want to create an edge detection effect, to do that we need to apply a Sobel operator
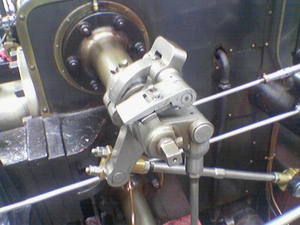
A color picture of a steam engine
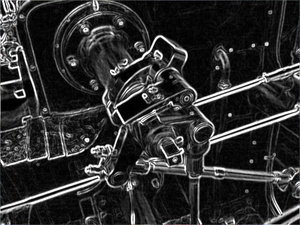
The Sobel operator applied to that image
Basically, this method implies matrix operations with the nearest pixels of each pixel. To do that in a material we would start taking the neighbor UV coordinates of each pixel, and this would start to get tangled.
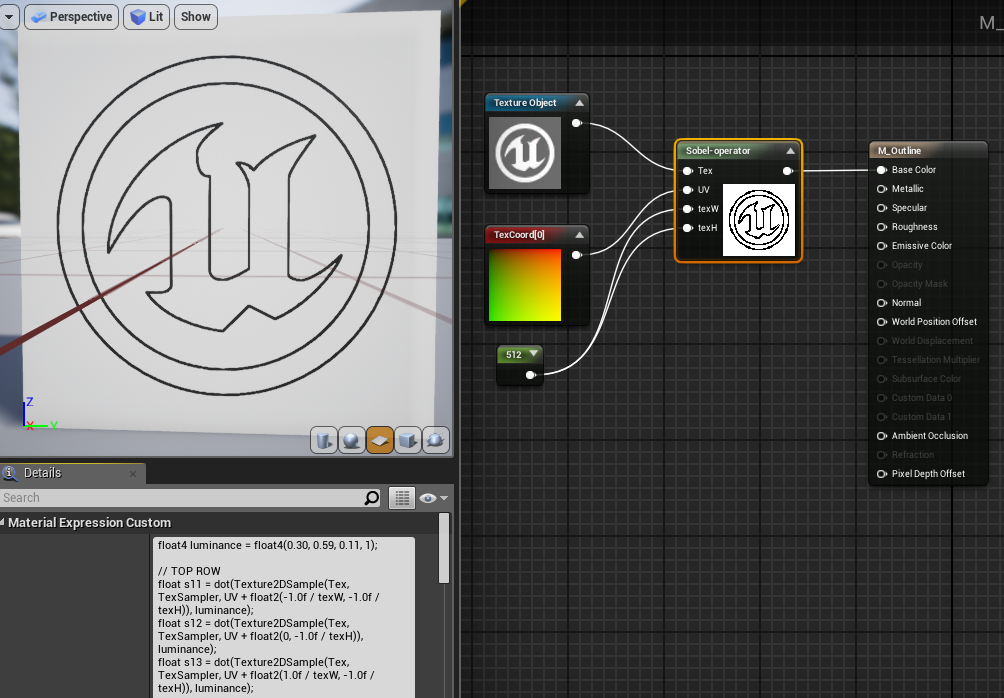
To avoid that UE4 material editor has a special node Custom. The Custom expression allows us to write custom HLSL shader code operating on an arbitrary amount of inputs and outputting the result of the operation.
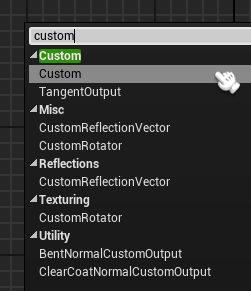
Material editor context menu
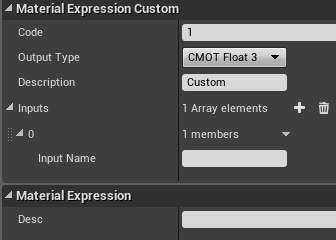
Custom node details
We can start adding some input parameters, we need the image, texture coordinates node, and the texture dimensions.
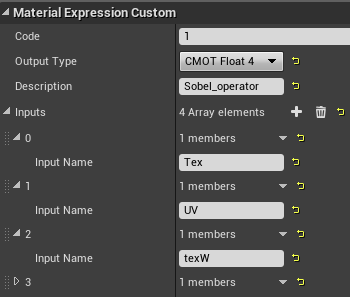
Custom sobel details
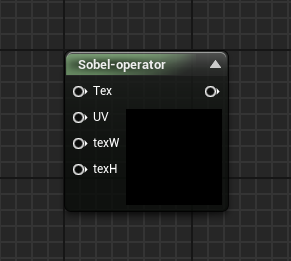
Custom sobel node
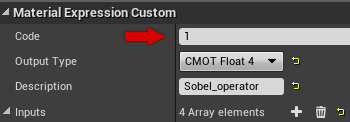
Now we need to add the code in the Code field of the node details section
To apply a Sobel operator we need to:
- Compute the luminance
- Calculate the vertical Sobel filter
- Calculate the horizontal Sobel filter
- Calculate the final value using the vertical and horizontal results
Luminance adjust the brightness to indicates appropriately what we really see, because human eyes don’t detect brightness linearly with color, the color with more Green is brighter to the eye than the color with more Blue. The purpose of luminance is to show that difference.
To compute the luminance we need to use dot product with the color of neighboring pixels and the luminance vector (0.30, 0.59, 0.11, 1).
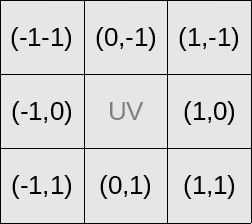
Don’t forget to divide the offset by the appropriate texture dimension.
float4 luminance = float4(0.30, 0.59, 0.11, 1);

// TOP ROW
float s11 = dot(Texture2DSample(Tex, TexSampler, UV + float2(-1.0f / texW, -1.0f / texH)), luminance);
float s12 = dot(Texture2DSample(Tex, TexSampler, UV + float2(0, -1.0f / texH)), luminance);
float s13 = dot(Texture2DSample(Tex, TexSampler, UV + float2(1.0f / texW, -1.0f / texH)), luminance);

// MIDDLE ROW
float s21 = dot(Texture2DSample(Tex, TexSampler, UV + float2(-1.0f / texW, 0)), luminance);
float s23 = dot(Texture2DSample(Tex, TexSampler, UV + float2(1.0f / texW, 0)), luminance);

// LAST ROW
float s31 = dot(Texture2DSample(Tex, TexSampler, UV + float2(-1.0f / texW, 1.0f / texH)), luminance);
float s32 = dot(Texture2DSample(Tex, TexSampler, UV + float2(0, 1.0f / texH)), luminance);
float s33 = dot(Texture2DSample(Tex, TexSampler, UV + float2(1.0f / texW, 1.0f / texH)), luminance);
Now we can apply the convolution matrix of both Sobel kernels.
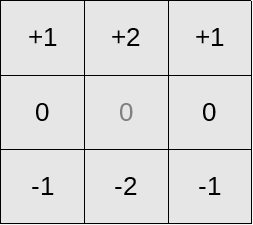
Sobel horizontal kernel
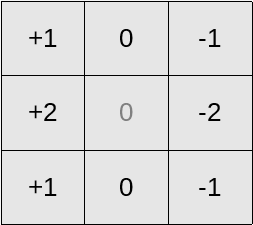
Sobel vertical kernel
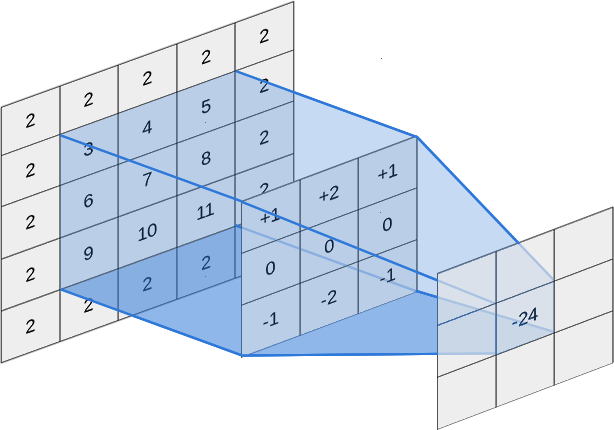
This process consists of multiplying each neighboring pixel with the corresponding kernel cell value and adding all the results.
float sobel_h = s11 + (2 * s12) + s13 - s31 - (2 * s32) - s33;
float sobel_v = s11 + (2 * s21) + s31 - s13 - (2 * s23) - s33;
Finally we need to use this values to determine the pixel color value using a threshold of 0.05.
float4 luminance = float4(0.30, 0.59, 0.11, 1);
// TOP ROW
float s11 = dot(Texture2DSample(Tex, TexSampler, UV + float2(-1.0f / texW, -1.0f / texH)), luminance);
float s12 = dot(Texture2DSample(Tex, TexSampler, UV + float2(0, -1.0f / texH)), luminance);
float s13 = dot(Texture2DSample(Tex, TexSampler, UV + float2(1.0f / texW, -1.0f / texH)), luminance);
// MIDDLE ROW
float s21 = dot(Texture2DSample(Tex, TexSampler, UV + float2(-1.0f / texW, 0)), luminance);
float s23 = dot(Texture2DSample(Tex, TexSampler, UV + float2(1.0f / texW, 0)), luminance);
// LAST ROW
float s31 = dot(Texture2DSample(Tex, TexSampler, UV + float2(-1.0f / texW, 1.0f / texH)), luminance);
float s32 = dot(Texture2DSample(Tex, TexSampler, UV + float2(0, 1.0f / texH)), luminance);
float s33 = dot(Texture2DSample(Tex, TexSampler, UV + float2(1.0f / texW, 1.0f / texH)), luminance);
float sobel_h = s11 + (2 * s12) + s13 - s31 - (2 * s32) - s33;
float sobel_v = s11 + (2 * s21) + s31 - s13 - (2 * s23) - s33;
float4 result;
if (((sobel_h * sobel_h) + (sobel_v * sobel_v)) > 0.05)
{
result = float4(0,0,0,1);
}
else
{
result = float4(1,1,1,1);
}
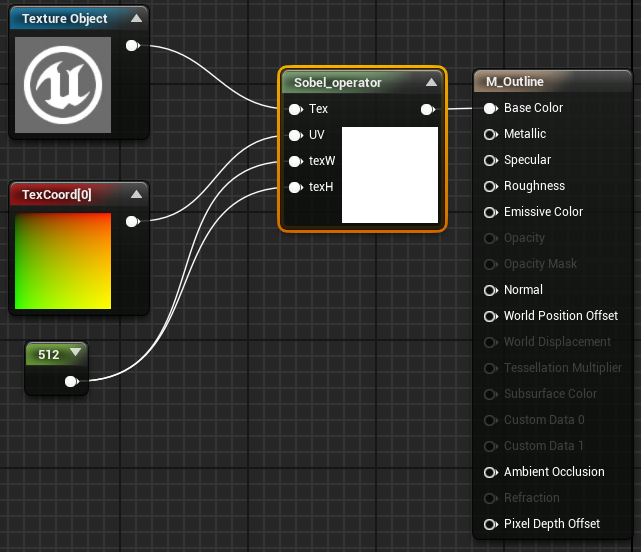
return result;Now we can paste this code in our Custom expression node
Using the custom node can be useful to reduce the material tangling but prevents constant folding and may use significantly more instructions than an equivalent version done with built in nodes. Constant folding is an optimization that UE4 employs under the hood to reduce shader instruction count when necessary. For example, an expression chain of Time >Sin >Mul by parameter > Add to something can and will be collapsed by UE4 into a single instruction, the final add. This is possible because all of the inputs of that expression (Time, parameter) are constant for the whole draw call, they do not change per-pixel. UE4 cannot collapse anything in a custom node, which can produce less efficient shaders than an equivalent version made out of existing nodes. As a result, it is best to only use the custom node when it gives you access to functionality not possible with the existing nodes.
You may also like:

Support this blog!
For the past year we have been dedicating more of our time to the creation of tutorials, mainly about game development. If you think these posts have either helped or inspired you, please consider supporting this blog. Thank you so much for your contribution!


