With this tutorial we are going to create an hologram projector using the Niagara particle system of Unreal Engine 4. An easy way to make a dynamic mesh render using particles.
The hologram source
Our first step is to define the entry of the hologram system. For this example we are going to feed the hologram with a special heightmap texture. This texture can be generated dynamically using a SceneCapture2D tool.
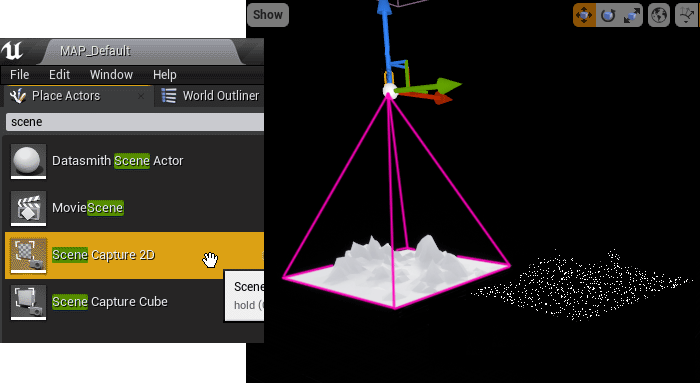
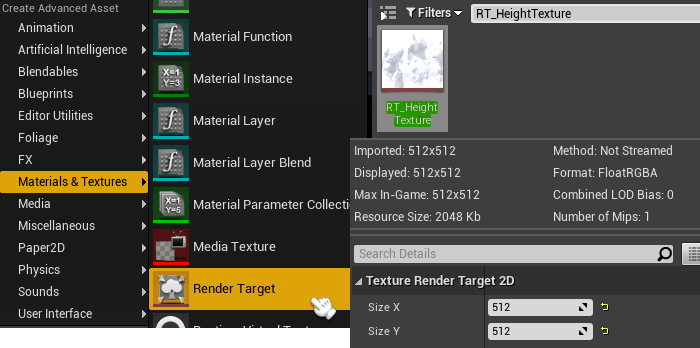
The SceneCapture2D is like a camera that we can put into the level to obtain a top-view of the object to render. The result of the render will be stored in a RenderTarget object. We need to create this object using the content browser context menu. If we open the object we can set some texture options like the dimensions, for this example we are going to use a texture of 512×512.
Now we need to select our SceneCapture2D object and set the previous RenderTarget as their Texture Target.
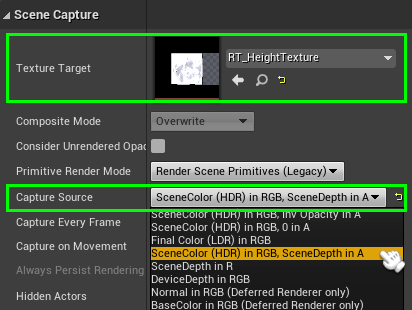
We need to set the Capture Source to SceneColor (HDR) in RGB, SceneDepth in A. It’s important because we can store the color of the rendered object in the RGB layers and the distance of each pixel to the camera in the Alpha layer. This information will be used in the Particle system to set the height of the particles in the hologram.
The particle system
To do the hologram part we are going to use a Niagara Emitter. The Niagara emitter is the particle generator but can’t be dragged directly into the scene alone, it must be inside a Niagara System. The Niagara system is the particle system, but doesn’t generate particles, it’s a container of Niagara emitters (multiple emitters can be added to the same system to do more complex effects), and can be dragged into the scene.
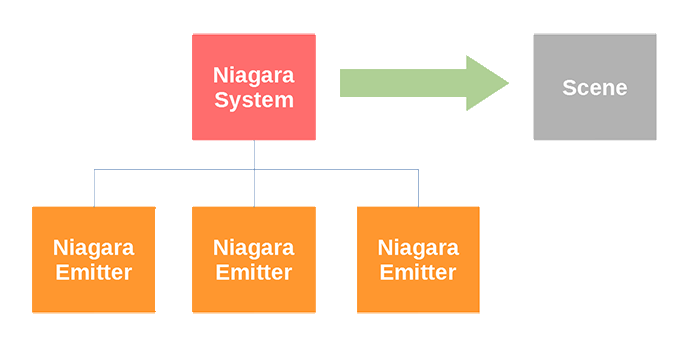
The emitter that we can see inside the system is an instance of the original emitter, so we can adjust the values of the emitter locally in the Niagara system and keep the original emitter properties safe in the Niagara Emitter object.
The hologram
In our hologram the particles starts in a outer ring, their spawn position, and travels to the center to draw the profile of the rendered object, their destination position.
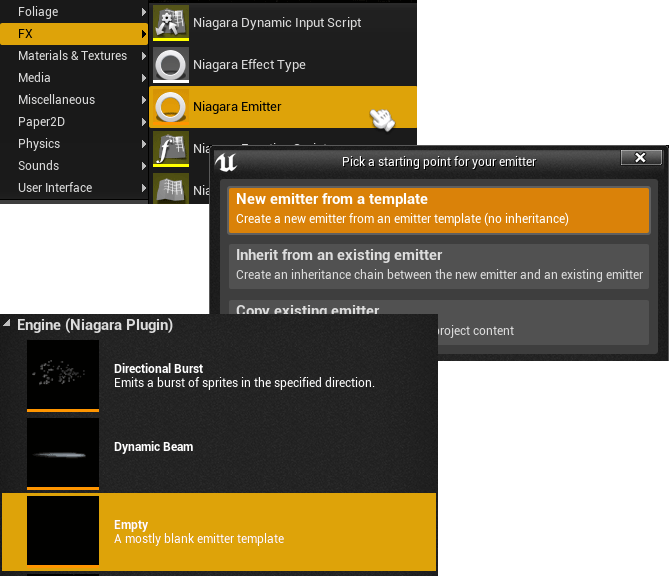
Now we can continue creating the Niagara Emitter. Using the context menu from the content browser we can create and empty Niagara emitter selecting the Empty template, we can name it as NE_Hologram.
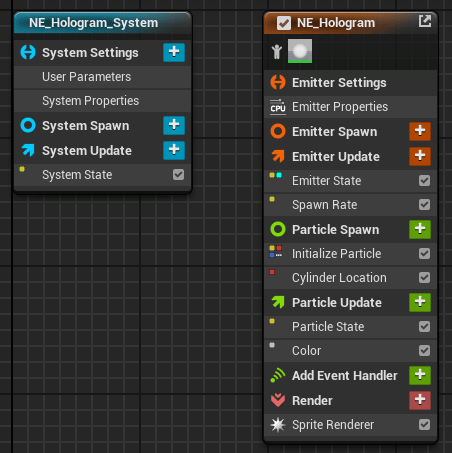
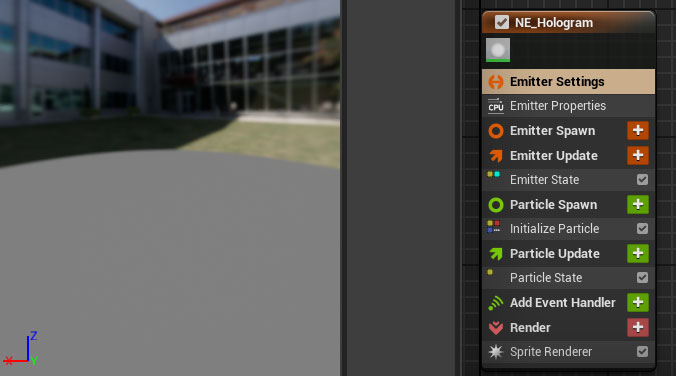
If we open the NE_Hologram class we can find the emitter configuration node. We can see different groups that include multiple modules. More modules can be added using the plus icon of the right of each group name.
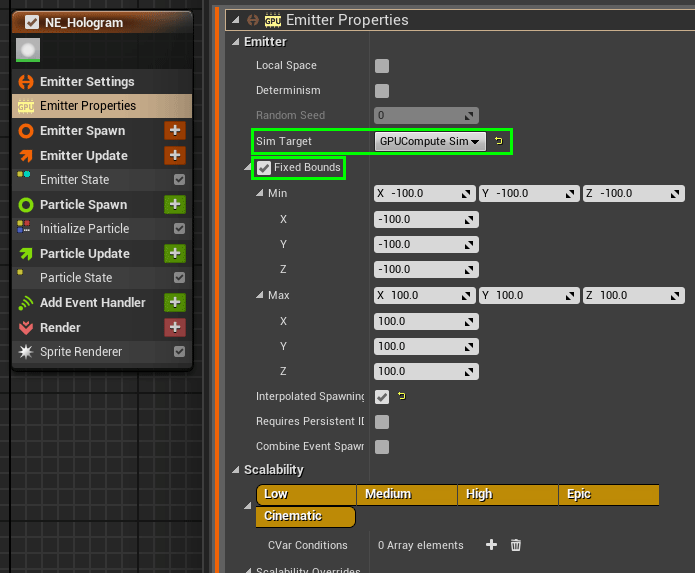
Into Emitter Settings group we can find Emitter Properties module, if we select this module we can see more options in the Selection tab in the right panel. For our emitter we need to select GPUCompute Sim as the Sim Target, to be able to use our heighmap texture later, and Fixed Bounds.
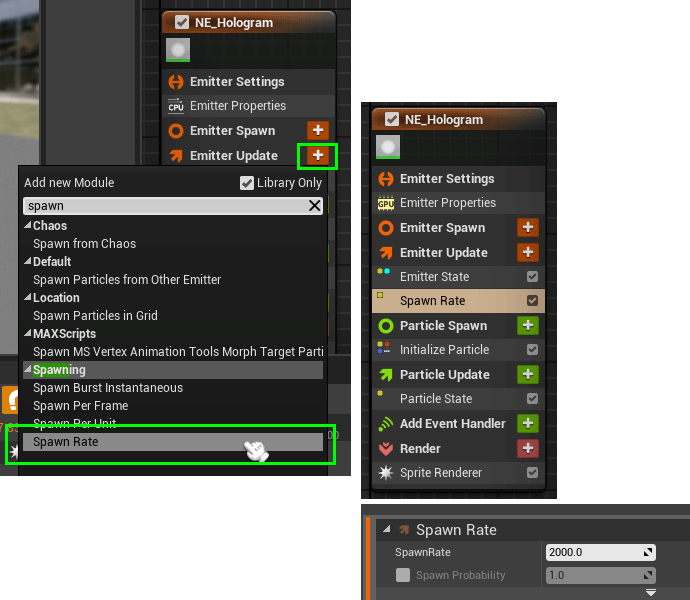
Now we are going to add a module to control the spawn rate of the particles into the Emitter Update group, so click on the add icon and search for Spawn Rate module. For our example a value of 2000 is a great value.
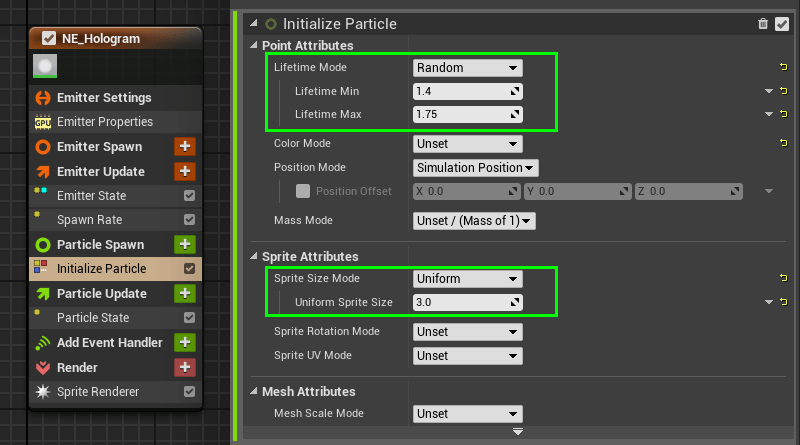
Now in the next group Particle Spawn we need to edit the Initialize Particle options. We are going to change the Lifetime Mode to Random and the Sprite Size Mode to Uniform with a sprite size value of 3 units, we want small particles.
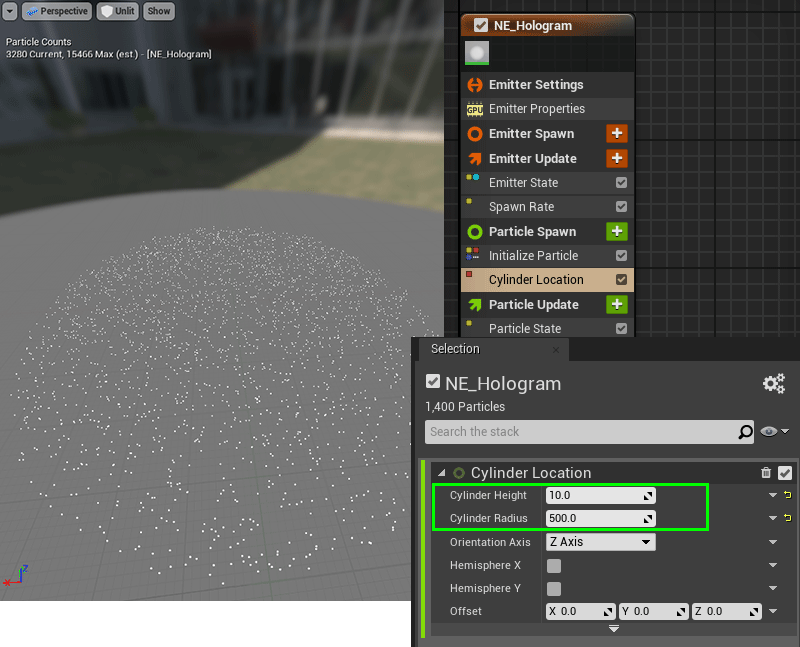
We can add other module in this group to spawn our particles in a outer ring around the hologram, so click on the add icon and search for Cylinder Location. As our platform is a panel with scale of 1 the size of the platform is 1000 units, so our cylinder must have a radius of 500 and reduce the height to 10 units to spawn the particles in a low cylinder.
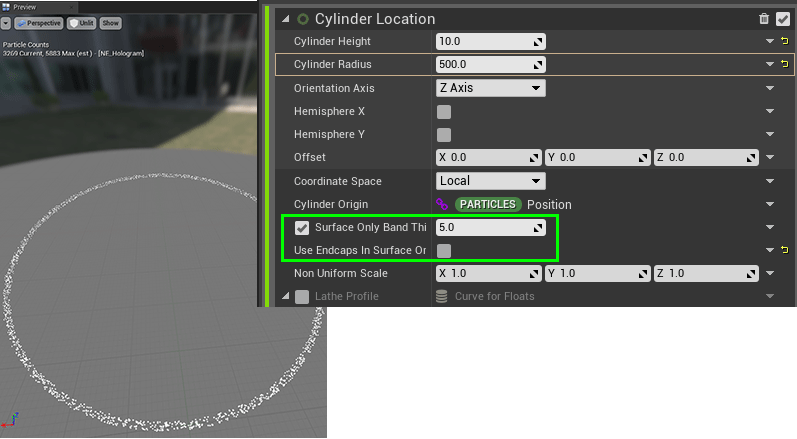
Now we can expand the section for more options using the white arrow of the bottom and check Surface Only Band Thickness to limit the particles spawn around the surface, and disable Use Endcaps In Surface Only mode to remove the particles from the end caps.
We have end to define the initial particle spawn position. It’s time to start with the hardest part.
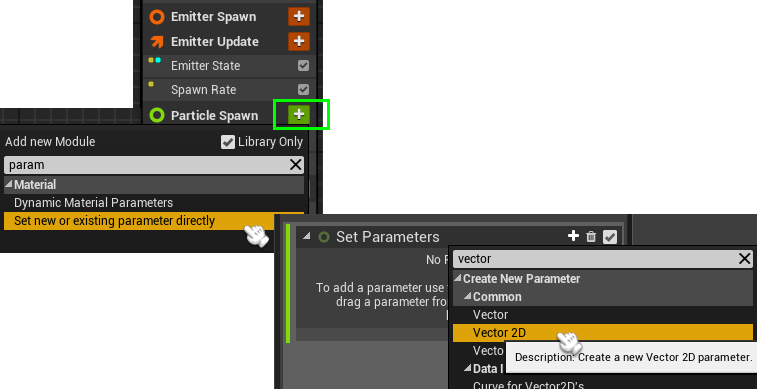
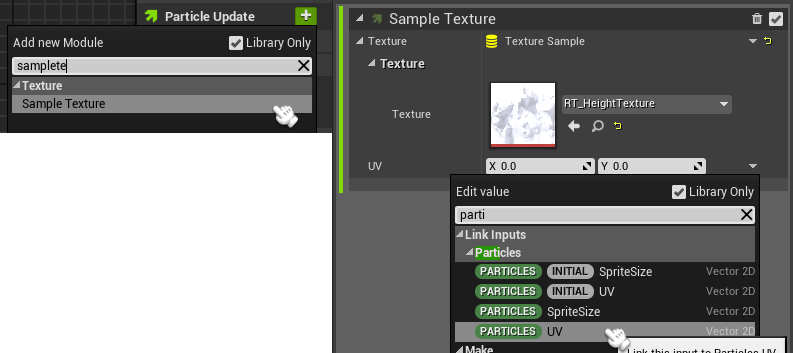
We are going to work using a texture and each particle will represent a position of this texture, so we are going to create a parameter in the Particle Spawn group to set the position of the particle relative to the texture coordinates, we can call it particle UV. When the particle spawns we will generate a random U and V value to connect the particle with a position of the texture. To do that we are going to start adding a Vector 2D parameter to the Particle Spawn group.
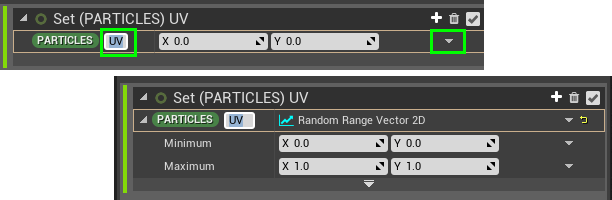
We can rename it to UV and change the value to a Random Range Vector 2D, as it represents a texture UV position their value must be generated between (0,0) and (1,1).
And now the last group Particle Update group. The first module to add is a Sample Texture. Here we must put our render target texture and the UV coordinates the previous parameter Particles.UV
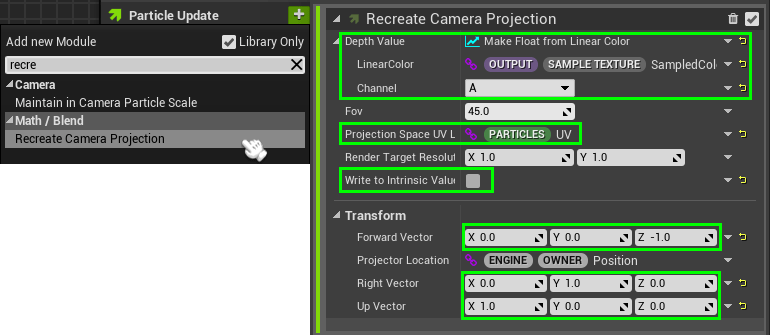
The next module that we need is Recreate Camera Projection. Depth Value must change to Make Float from Linear Color, LinearColor values must be changed to Output.SampleTexture.SampledColor and Channel to A value, we want to extract the data from the Alpha channel to define the destination of the particle.
The Projection Space UV Location must be set to our parameter Particles.UV, and we need to disable Write to Instrinsic Value.
The Tranform vectors must be configured to do a topview projection.
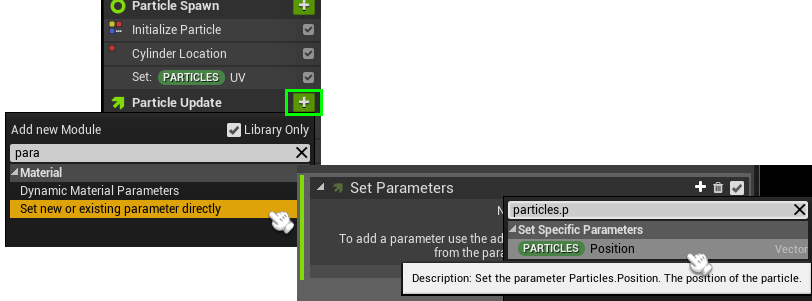
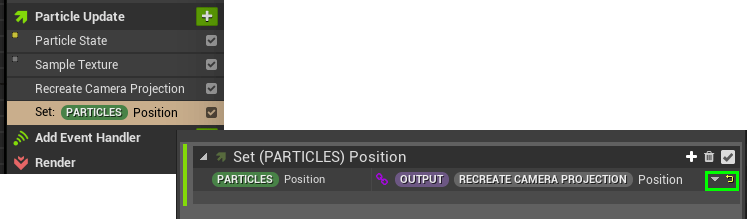
One of the last modules to be added in this group is a new parameter that overrides the particle position parameter. We need to select Particles.Position when the parameter is created.
The value of this parameter will be Output.RecreateCameraProjection.Position
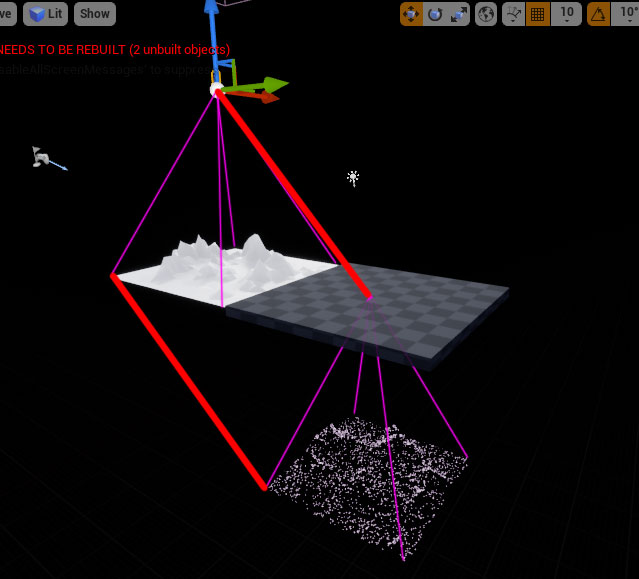
Now we can see the projected mesh but it is displaced from the system location. It is normal because we are using the distance to the SceneCapture camera and the projector camera is at height 0.
An easy way to fix this is by moving the particle system scene object to the same height of the camera. But we are going to use a second option, we are going to make a Niagara Module Script to adjust the camera’s projector.
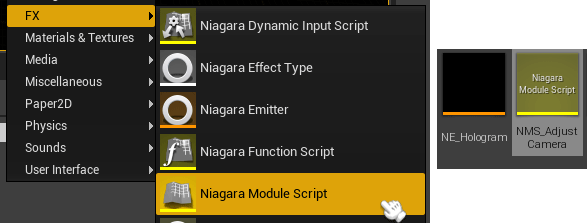
In the content browser, using the menu, select Niagara Module Script.
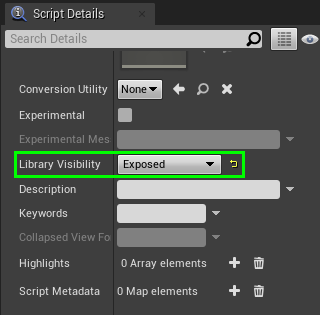
To be able to see the script in the module browser of the emitter we need to change their Library Visibility to Exposed
Now we can start to add the input and output parameters. Using the + button from the Map Get node we can add the inputs, and the + button from the Map Set node to add the output.
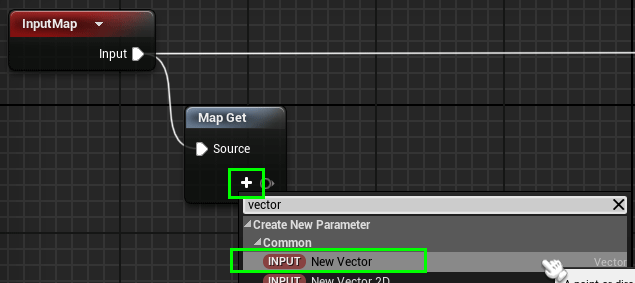
The output of our script is Particles.Position, we are going to rename it as ProjectedPosition after adding the parameter.
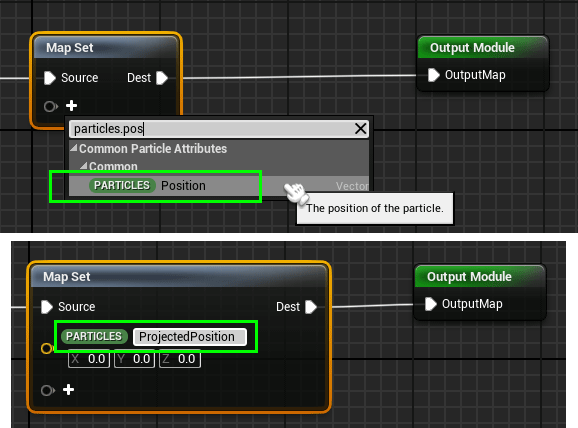
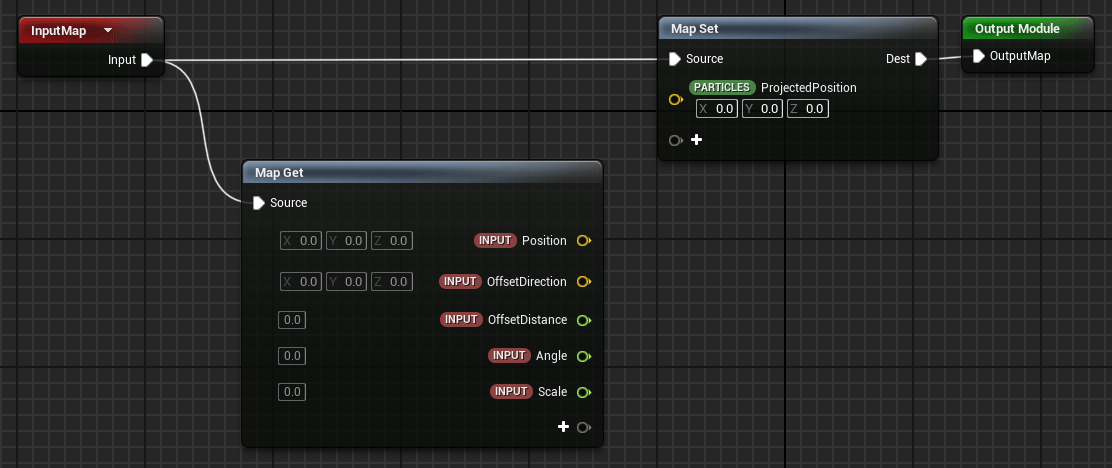
We need multiple inputs. The first one is a vector with the Position value (the Output.RecreateCameraProjection.Position value), one float (OffsetDistance) to put the distance between the scenecapture object and the mesh to render, one vector (OffsetDirection) to control the direction of the previous offset.
We are going to add two more parameters to control the size of the camera cone to be able to scale up or down the final mesh, so we need an Angle (that can be the same as the SceneCapture camera) and a Scale value in units.
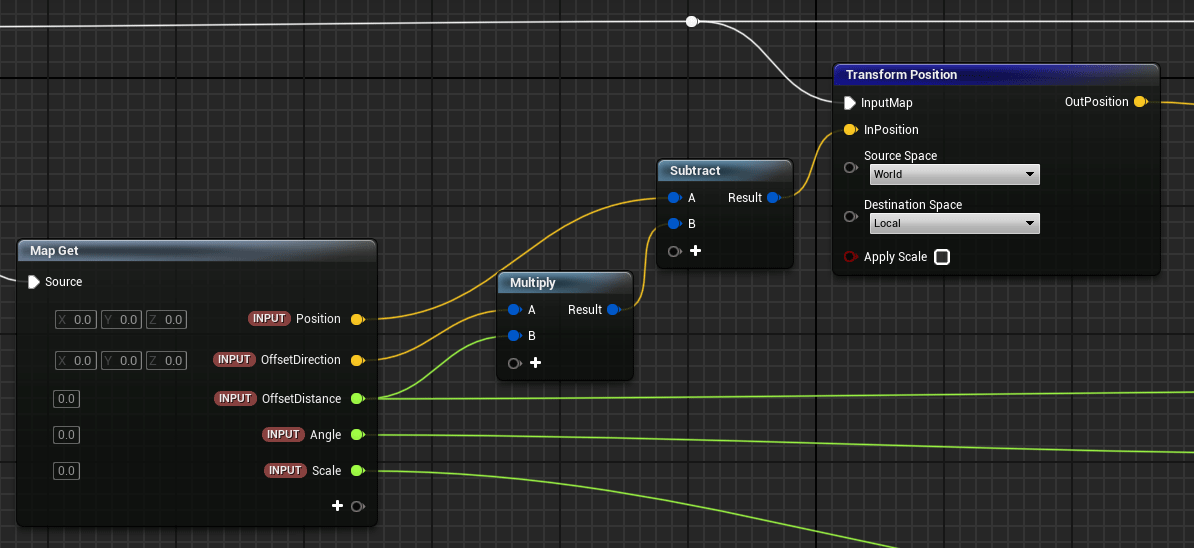
In the first part of the script we are going to fix the offset of the camera to put the hologram mesh in the zero height position, so we only need to subtract the camera distance to the position.
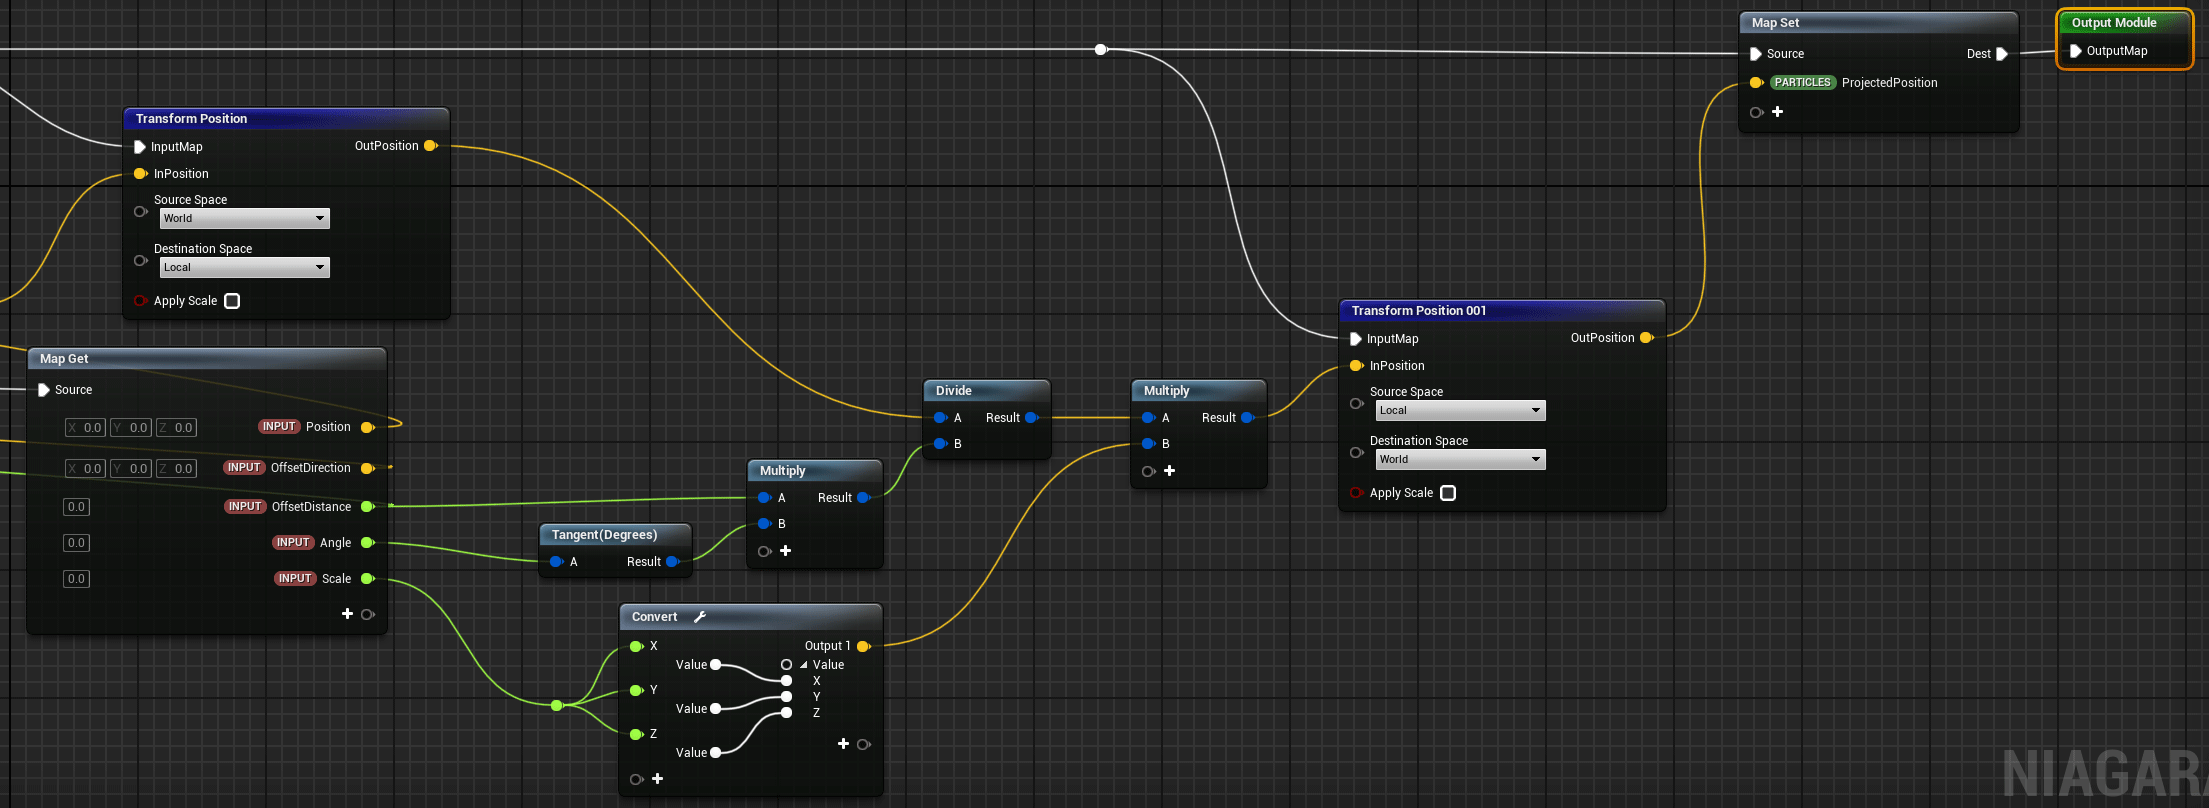
In the second part we are going to apply the scale
Now in our Emitter we can add this module to the Particle Update group, we need to drag the module before our Position parameter to be able to use their output values in that module
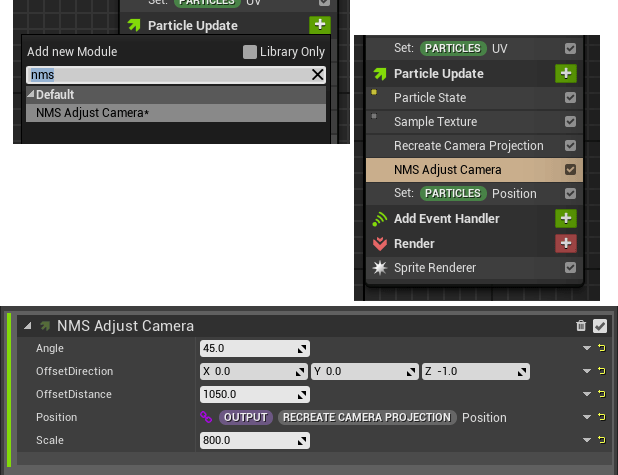
After that we can set the input parameters of the script module, the angle will be the same of the SceneCapture camera, the offset vector for a top-down view. The offset distance will be a bit higher than the SceneCapture height, resulting in a hologram mesh a bit raised from the outer ring. As our ring has a diameter of 1000 units we need to scale down the hologram mesh to fit the corners inside the ring, so a scale of 800 will be fine. The Position will be set Output.RecreateCameraProjection.Position.
Now we need to re-edit the module that overrides the Particles.Position parameter to use the projected position of the script.
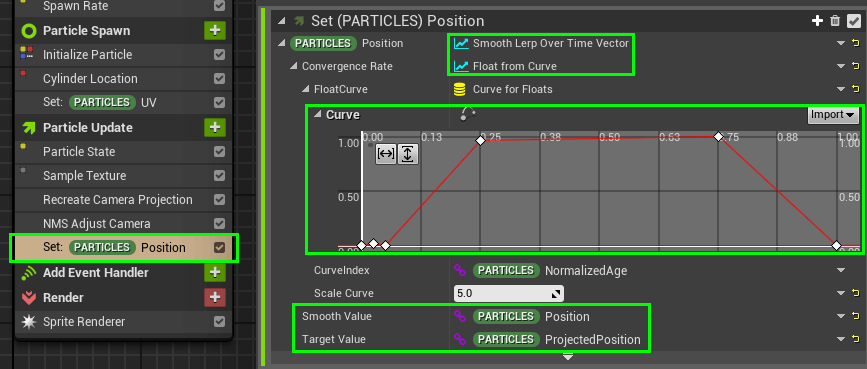
Change the value of the parameter to use Smooth Lerp Over Time Vector instead of a fixed vector. Now set the Smooth Value to Particles.Position and the target Value to Particles.ProjectedPosition. We are going to do a linear interpolation in time between this two positions. The particle will travel from the spawn outer ring to their position in the mesh, their velocity will be configure using the curve of this module. At the beginning and at the end we want to slow down the particle to be able to visually appreciate the ring and the mesh.
The last step is to create the Niagara System from the Emitter. We can right click on the emitter icon in the content browser and click on Create Niagara System. This particle system object can be dragged now into the scene.
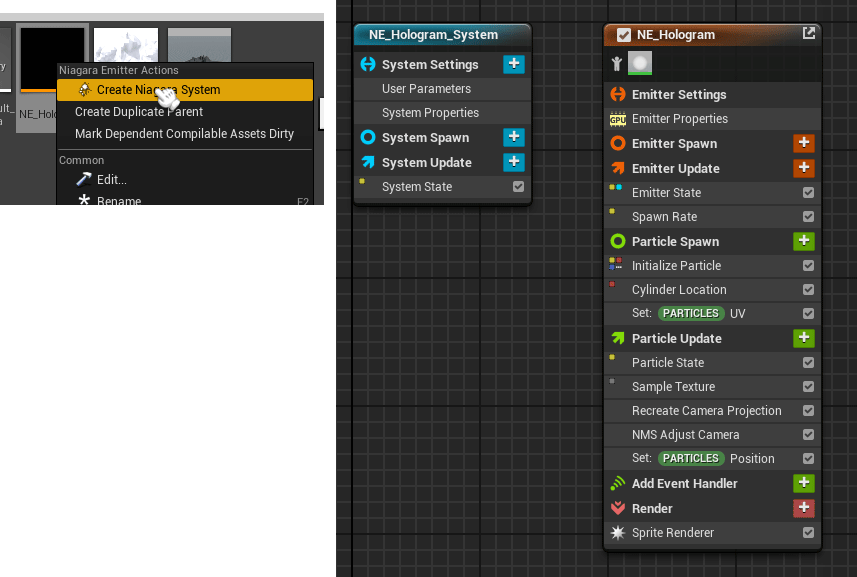
As we say at the beginning of the section, from the system blueprint we can see and reconfigure the emitter values if we want to do specific changes for this system.

We have finished our dynamic hologram projector. To change the hologram mesh we only need to replace the object that is in front of the SceneCapture camera by other object, but we need to keep in mind that we are using the view from the top, so the holes of the object will be missing, we have stored only one height for each pixel.
One way to fix that is to have more SceneCapture objects from different axis and combine the result mesh of each one into a big hologram mesh adjusting the orientation vectors.
Tutorial files
You may also like:

Support this blog!
For the past year we have been dedicating more of our time to the creation of tutorials, mainly about game development. If you think these posts have either helped or inspired you, please consider supporting this blog. Thank you so much for your contribution!


