
With this tutorial we are going to make an outline effect around objects. This effect has been used in multiple games to show that we can interact with the object or can be collected.
Part 1: Outline effect
Part 2: Occlusion, colors and glow
Part 3: Opaque zones
Part 4: Depth limit
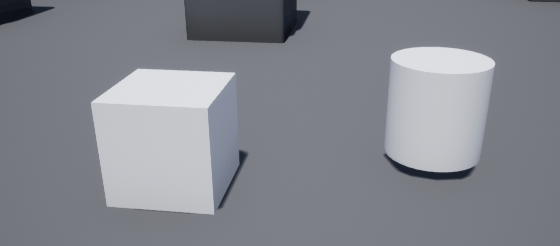
The first thing is to understand the Custom Depth and Custom Stencil concepts. The custom depth is a depth buffer introduced by Unreal Engine 4 along with their physically based rendering system (PBR). A depth texture keeps information about distance between each individual pixel in world space and a camera.
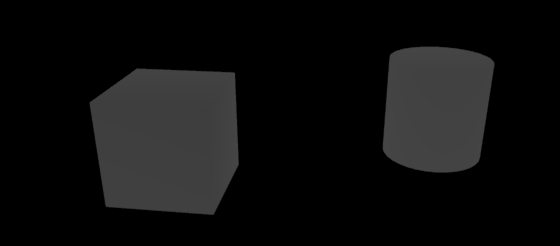
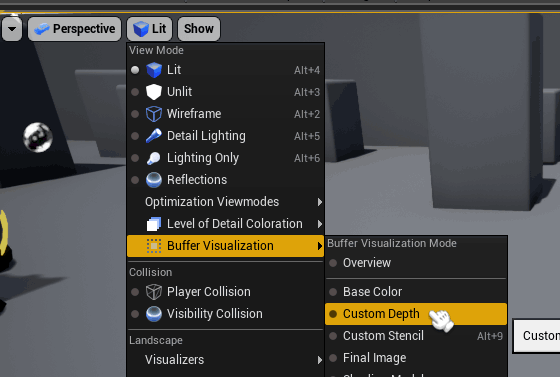
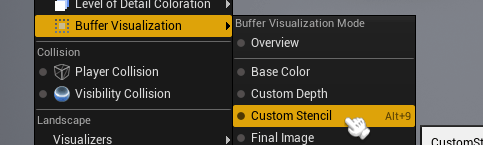
We can see this buffer visualization from the level viewport menu
View Mode > Buffer Visualization > Custom Depth
Custom Stencil is a buffer similar to Custom Depth that allows meshes to render as integer values. With this buffer we can process the 3D objects as shapes that changes with the camera orientation.
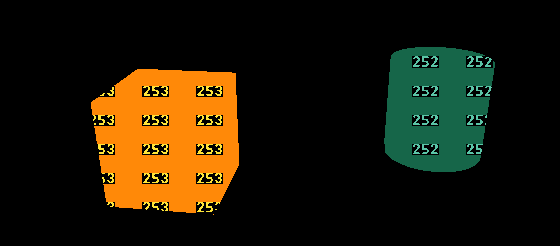
We can see this buffer using the same menu as the Custom Depth but choosing Stencil.
View Mode > Buffer Visualization > Custom Stencil
By default Custom stencil rendering is disabled, to enable it we need to go to Window > Project Settings > Rendering > Post Process > Custom Depth-stencil Pass and set it to Enabled with Stencil.

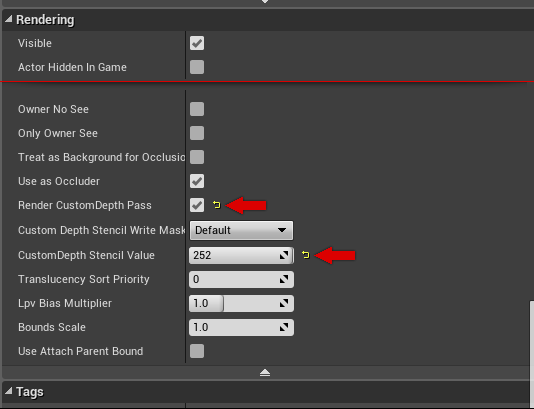
To set the stencil value in a mesh we need to enable the option Render CustomDepth Pass at Rendering section, and set the desired value in the CustomDepth Stencil Value field.
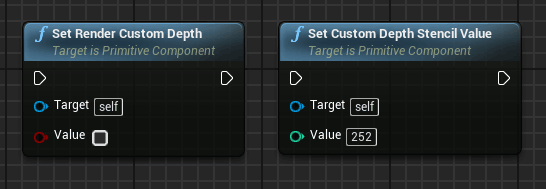
Or we can use the blueprint nodes too:
Now we can start with the material. At this moment, custom depth does not work on translucent materials so we are going to work using Opaque material. The translucent workaround is to use a second copy of the mesh using a simple opaque material with Custom Depth enabled and Render Main pass disabled.
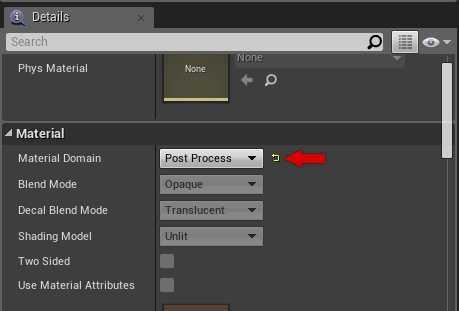
We need to set the material domain to post process.
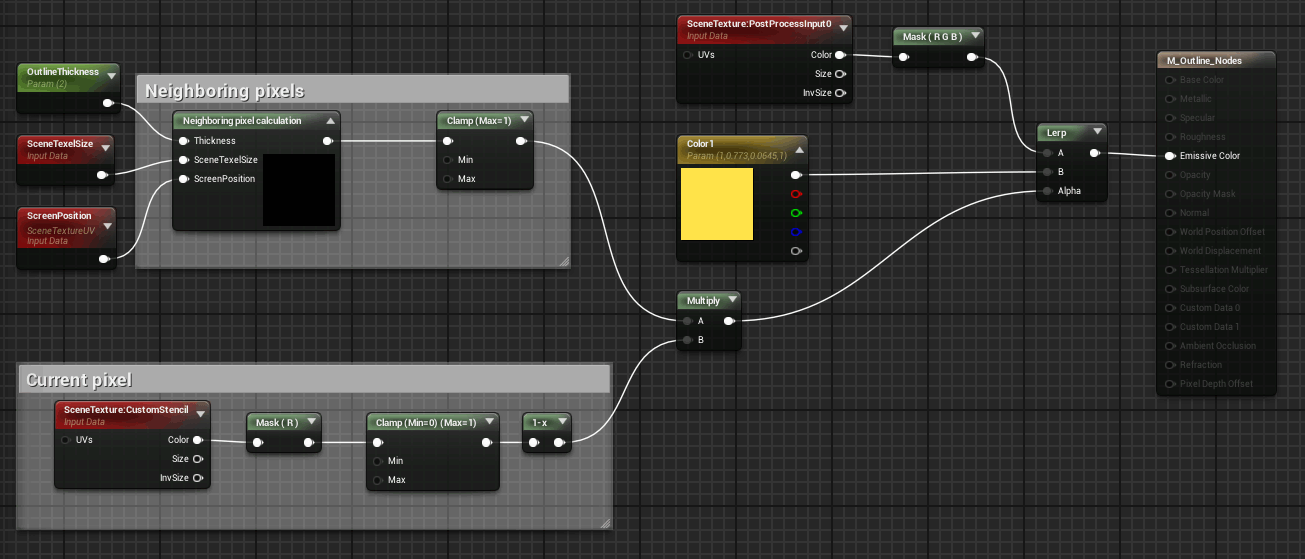
To determine if the pixel is inside the outline we need to check the Stencil value of the neighboring pixels, taking into account the line thickness to apply the UV offsets. We can create a Custom expression and insert the code shown below to do this. If you need a short brief about how to use it you can check the previous tutorial HLSL and UE4
float offset_h = SceneTexelSize.r * Thickness;
float offset_v = SceneTexelSize.g * Thickness;

float TL = GetScreenSpaceData(ScreenPosition + float2(-offset_h, -offset_v), false).GBuffer.CustomStencil.r;
float TM = GetScreenSpaceData(ScreenPosition + float2(0, -offset_v), false).GBuffer.CustomStencil.r;
float TR = GetScreenSpaceData(ScreenPosition + float2(offset_h, -offset_v), false).GBuffer.CustomStencil.r;

float ML = GetScreenSpaceData(ScreenPosition + float2(-offset_h, 0), false).GBuffer.CustomStencil.r;
float MR = GetScreenSpaceData(ScreenPosition + float2(offset_h, 0), false).GBuffer.CustomStencil.r;

float BL = GetScreenSpaceData(ScreenPosition + float2(-offset_h, offset_v), false).GBuffer.CustomStencil.r;
float BM = GetScreenSpaceData(ScreenPosition + float2(0, offset_v), false).GBuffer.CustomStencil.r;
float BR = GetScreenSpaceData(ScreenPosition + float2(offset_h, offset_v), false).GBuffer.CustomStencil.r;

return max(TL, max(TM, max(TR, max(ML, max(MR, max(BL, max(BM, BR ) ) ) ) ) ) );
Since engine version 4.19, the ScreenPosition node returns the ViewportUV instead of Buffer UV so we need to call ViewportUVToBufferUV to convert from viewport to buffer position:
float offset_h = SceneTexelSize.r * Thickness;
float offset_v = SceneTexelSize.g * Thickness;

float TL = GetScreenSpaceData(ViewportUVToBufferUV(ScreenPosition + float2(-offset_h, -offset_v)), false).GBuffer.CustomStencil.r;
float TM = GetScreenSpaceData(ViewportUVToBufferUV(ScreenPosition + float2(0, -offset_v)), false).GBuffer.CustomStencil.r;
float TR = GetScreenSpaceData(ViewportUVToBufferUV(ScreenPosition + float2(offset_h, -offset_v)), false).GBuffer.CustomStencil.r;

float ML = GetScreenSpaceData(ViewportUVToBufferUV(ScreenPosition + float2(-offset_h, 0)), false).GBuffer.CustomStencil.r;
float MR = GetScreenSpaceData(ViewportUVToBufferUV(ScreenPosition + float2(offset_h, 0)), false).GBuffer.CustomStencil.r;

float BL = GetScreenSpaceData(ViewportUVToBufferUV(ScreenPosition + float2(-offset_h, offset_v)), false).GBuffer.CustomStencil.r;
float BM = GetScreenSpaceData(ViewportUVToBufferUV(ScreenPosition + float2(0, offset_v)), false).GBuffer.CustomStencil.r;
float BR = GetScreenSpaceData(ViewportUVToBufferUV(ScreenPosition + float2(offset_h, offset_v)), false).GBuffer.CustomStencil.r;

return max(TL, max(TM, max(TR, max(ML, max(MR, max(BL, max(BM, BR ) ) ) ) ) ) );
Since engine version 4.20 we must check if we are using SceneTexture properties ( like the access to the property CustomStencil of GBuffer), to avoid compilation errors we need to add the next preprocessor directive
#if SCENE_TEXTURES_DISABLED
return 0;
#endif
So our final code is:
#if SCENE_TEXTURES_DISABLED
return 0;
#endif
float offset_h = SceneTexelSize.r * Thickness;
float offset_v = SceneTexelSize.g * Thickness;

float TL = GetScreenSpaceData(ViewportUVToBufferUV(ScreenPosition + float2(-offset_h, -offset_v)), false).GBuffer.CustomStencil.r;
float TM = GetScreenSpaceData(ViewportUVToBufferUV(ScreenPosition + float2(0, -offset_v)), false).GBuffer.CustomStencil.r;
float TR = GetScreenSpaceData(ViewportUVToBufferUV(ScreenPosition + float2(offset_h, -offset_v)), false).GBuffer.CustomStencil.r;

float ML = GetScreenSpaceData(ViewportUVToBufferUV(ScreenPosition + float2(-offset_h, 0)), false).GBuffer.CustomStencil.r;
float MR = GetScreenSpaceData(ViewportUVToBufferUV(ScreenPosition + float2(offset_h, 0)), false).GBuffer.CustomStencil.r;

float BL = GetScreenSpaceData(ViewportUVToBufferUV(ScreenPosition + float2(-offset_h, offset_v)), false).GBuffer.CustomStencil.r;
float BM = GetScreenSpaceData(ViewportUVToBufferUV(ScreenPosition + float2(0, offset_v)), false).GBuffer.CustomStencil.r;
float BR = GetScreenSpaceData(ViewportUVToBufferUV(ScreenPosition + float2(offset_h, offset_v)), false).GBuffer.CustomStencil.r;

return max(TL, max(TM, max(TR, max(ML, max(MR, max(BL, max(BM, BR ) ) ) ) ) ) );
We need to remove the internal pixels to retrieve only the outline edge. We can apply a color to the outline using the pixel value as alpha between the pixel color and the outline color.
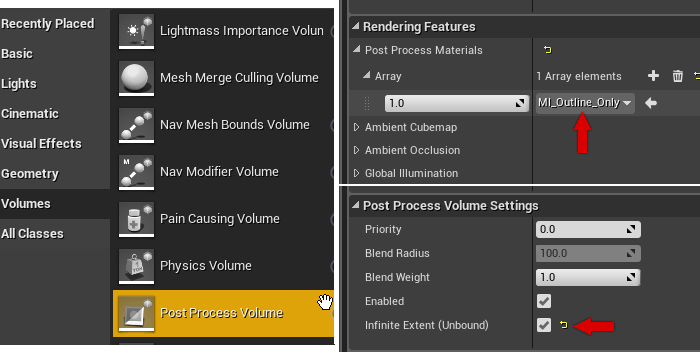
To use this material we can create a Material Instance to set our desired parameters values as thickness and color.

This instance must be added to the Materials list of the Post Process Volume, we can enable the Infinite Extend check if we want to apply the effect to the entire world, regardless of the volume bounds.
Now that our outline effect is working we can add more features as the processing of the occlusion. But this is something to do in the next part of this tutorial.

Tutorial files
2022/04/14 – Updated to UE5 5.00
You may also like:

Support this blog!
For the past year we have been dedicating more of our time to the creation of tutorials, mainly about game development. If you think these posts have either helped or inspired you, please consider supporting this blog. Thank you so much for your contribution!


My shader won’t compile and I an error message along the lines of [SM5] Base shaders can’t read SceneTextureStruct.
Any clue as to what I’ve missed?
Which engine version are you using ?
I know this tutorial is from a while ago, but for anyone wondering, custom depth now works with transparent materials (4.22+). In the transparent material’s details panel you just have to set “Allow Custom Depth Writes” to true (in the Advanced Display portion of the Translucency section). This adds a few additional shaders though, so keep that in mind when profiling/optimizing your game.
Thanks for the awesome tutorial my dude!
I know this is an old tutorial now but can you confirm if it works on UE5? I tried to follow it on UE4.27 and 5 but haven’t gotten it to produce an outline at all.
Hi
I have revised the tutorial and works with UE5.
Normally if people can’t see any outline is because forgot to enable the Custom Depth-Stencil Pass with the option Enabled with Stencil
MAKE SURE to connect the “ViewportUV” output pin, not “PixelPosition”
Regarding the ScreenPosition param (third param of Neighboring Pixel Calculation)
Because on UE5 ScreenPosition node give two output pins
Hey! Just saying thank you for this and the material. I was trying to find out how to get something to work with UE4 4.25.4 and yours did.
Nice and clear details! Great stuff.
thank you for your teaching While studying your shader code, I got this error, but I didn’t understand why I got this error. Is there anything I’m missing?
LogShaderCompilers: Warning: Failed to compile Material /Game/Blueprint/PostProcess/OutlinePostProcessMat.OutlinePostProcessMat for platform SF_VULKAN_ES31_ANDROID_NOUB, Default Material will be used in game.
LogShaderCompilers: Display: /Engine/Generated/Material.ush(2035): error: no matching function for call to ‘GetScreenSpaceData(vec2, bool)’
LogShaderCompilers: Display: /Engine/Generated/Material.ush(2035): error: type mismatch
LogShaderCompilers: Display: Worker (5/21): shaders left to compile 368
LogShaderCompilers: Display: /Engine/Generated/Material.ush(2036): error: no matching function for call to ‘GetScreenSpaceData(vec2, bool)’
What engine version are you using ?